โดเมนและอีเมลของคุณ
ใช้ชื่อโดเมนของคุณเอง ตั้งผู้ส่งอีเมล และเพิ่มโลโก้ BIMI
หน้านี้ทำอะไร
หน้านี้มีของใหญ่ ๆ อยู่สองอย่าง อย่างแรก คุณชี้โดเมนของตัวเองมาที่ร้านได้ (เช่น shop.yourbrand.com แทนที่จะเป็น yourname.dabdash.com) อย่างที่สอง คุณทำให้อีเมลส่งออกในนามที่อยู่อีเมลของคุณเองได้ แทนที่จะใช้ที่อยู่กลางของ DabDash
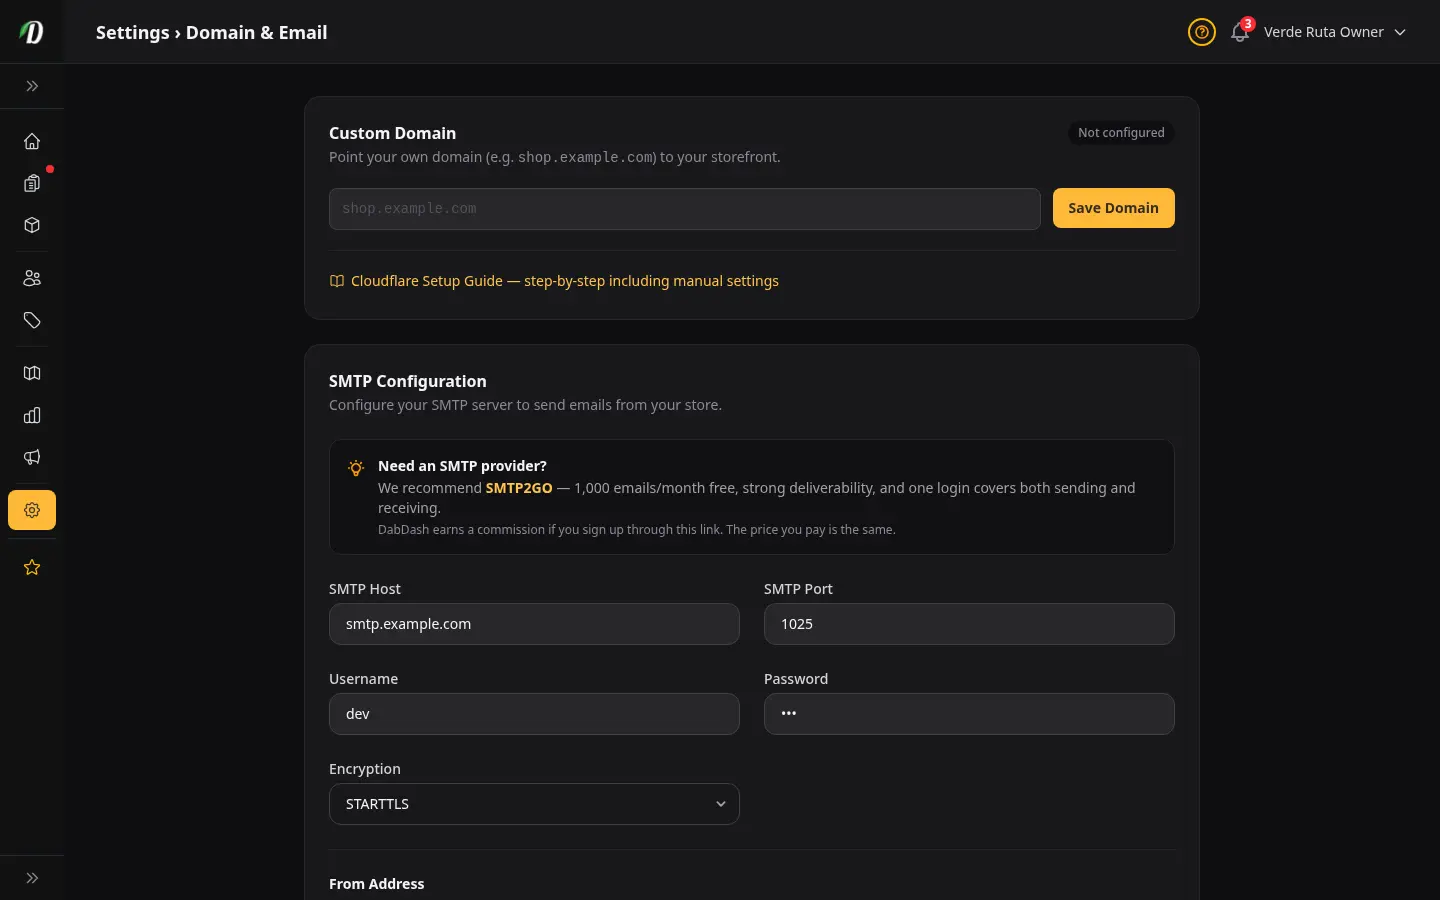
โดเมนของตัวเอง
ค่าเริ่มต้น ร้านของคุณจะอยู่ที่ yourname.dabdash.com แต่คุณใช้โดเมนของตัวเองแทนได้
วิธีตั้งค่า
- พิมพ์โดเมนของคุณ (เช่น
shop.yourbrand.com) ลงในช่องแล้วกด บันทึกโดเมน - คุณจะเห็นระเบียนสองอันที่ต้องไปเพิ่มในที่ที่คุณซื้อโดเมนมา (GoDaddy, Namecheap, Cloudflare ฯลฯ)
- เพิ่มระเบียนทั้งสองอันไว้ที่นั่น อาจใช้เวลาตั้งแต่ไม่กี่นาทีไปจนถึงไม่กี่ชั่วโมงกว่ามันจะทำงาน
- กลับมาที่นี่แล้วกด ตรวจสอบ DNS เมื่อผ่าน ป้ายจะเปลี่ยนเป็นสีเขียวและขึ้นว่า ใช้งานอยู่
ระเบียนสองอัน
- ระเบียน TXT
- ใช้ยืนยันว่าโดเมนเป็นของคุณ ก๊อปชื่อและค่ามาให้เป๊ะตามที่แสดง แล้วไปเพิ่มที่ผู้ให้บริการโดเมนของคุณ
- ระเบียน A
- ตัวนี้ส่งผู้เข้าชมจากโดเมนของคุณไปยังร้าน DabDash ค่าจะเป็น
93.95.229.147เสมอ
การลบโดเมน
กด ลบ ข้าง ๆ ช่องโดเมน ร้านของคุณจะกลับไปอยู่ที่ yourname.dabdash.com ทันที หลังจากนั้นคุณค่อยลบระเบียน DNS ออกจากผู้ให้บริการโดเมนของคุณได้
โลโก้ในอีเมล (BIMI)
BIMI ให้คุณแสดงโลโก้ข้าง ๆ ชื่อของคุณใน Gmail, Apple Mail และ Yahoo Mail ส่วนนี้จะโผล่มาหลังจากที่คุณบันทึกโดเมนของตัวเองแล้วเท่านั้น
วิธีใช้: อัปโหลดโลโก้เป็นไฟล์ SVG แล้วไปเพิ่มระเบียน DNS ที่แสดงบนหน้าจอที่ผู้ให้บริการโดเมนของคุณ Apple Mail กับ Yahoo จะเริ่มแสดงโลโก้ทันที ส่วน Gmail ต้องมีใบรับรองเพิ่ม (VMC) — คุ้มที่จะทำก็ต่อเมื่อลูกค้าส่วนใหญ่ของคุณใช้ Gmail
ผู้ส่งอีเมล (SMTP)
ค่าเริ่มต้น อีเมลออเดอร์ (ยืนยันคำสั่งซื้อ ใบเสร็จ แจ้งเตือน) จะส่งมาจากที่อยู่อีเมลกลางของ DabDash ถ้าคุณกรอกส่วนนี้ อีเมลจะส่งมาจากที่อยู่ ของคุณเอง แทน
ต้องกรอกอะไรบ้าง
- SMTP Host
- เซิร์ฟเวอร์ส่งออกของผู้ให้บริการอีเมลของคุณ ตัวอย่าง:
smtp.gmail.com,smtp.sendgrid.net - SMTP Port
- ส่วนใหญ่ใช้ 587 บางเจ้าใช้ 465
- Username & Password
- ข้อมูลล็อกอินที่ผู้ให้บริการอีเมลให้คุณมา ถ้าเป็น Gmail ให้ใช้ App Password (ไม่ใช่รหัสผ่าน Gmail ปกติ)
- การเข้ารหัส
- เกือบทุกครั้งจะเป็น TLS เลือก SSL เฉพาะตอนที่ผู้ให้บริการบอกให้เลือกเท่านั้น
ที่อยู่ผู้ส่ง
- อีเมลผู้ส่ง
- ที่อยู่อีเมลที่ลูกค้าเห็นในกล่องจดหมายของเขา ตัวอย่าง:
orders@yourbrand.com - ชื่อผู้ส่ง
- ชื่อที่แสดงข้าง ๆ อีเมล ตัวอย่าง: "Green Leaf Dispensary"
ทดสอบ
หลังจากบันทึก จะมีกล่อง ส่งอีเมลทดสอบ โผล่มา พิมพ์ที่อยู่อีเมลอะไรก็ได้แล้วกดปุ่ม ถ้าคุณได้รับอีเมลทดสอบ แปลว่าทุกอย่างทำงานได้
การกลับไปใช้ค่าเริ่มต้น
กด ลบการตั้งค่า ที่ด้านล่าง ช่อง SMTP ทั้งหมดจะถูกล้าง แล้วอีเมลจะกลับไปใช้ผู้ส่งกลางของ DabDash
อีเมลขาเข้า (IMAP/POP3)
เชื่อมกล่องจดหมายของคุณเองเข้ามา อีเมลที่ลูกค้าส่งมาหาคุณก็จะมาเด้งใน กล่องข้อความ ของคุณเลย รวมอยู่กับแชตสด — คุณตอบจากที่เดียวได้ ไม่ต้องสลับไปเปิดแอปอีเมลแยกอีก SMTP (ด้านบน) คือวิธีที่ร้านของคุณ ส่ง อีเมล ส่วนตรงนี้คือวิธีที่ร้าน รับ อีเมล
- ป้ายชื่อ
- ชื่อของกล่องจดหมายนี้ เอาไว้ให้แยกแยะออก — เช่น "กล่องซัพพอร์ต"
- โปรโตคอล
- เลือก IMAP (แนะนำ — เก็บข้อความไว้บนเซิร์ฟเวอร์และซิงค์กัน) หรือ POP3
- เซิร์ฟเวอร์ & พอร์ต
- เซิร์ฟเวอร์ขาเข้าและพอร์ตของผู้ให้บริการเมลของคุณ — เช่น
imap.gmail.comผู้ให้บริการจะมีบอกค่าพวกนี้ไว้ในหน้าช่วยตั้งค่า IMAP/POP - Username & Password
- ข้อมูลล็อกอินของกล่องจดหมาย ผู้ให้บริการหลายเจ้า (Gmail, Outlook) ต้องใช้ app password แทนรหัสปกติ — สร้างได้ในหน้าตั้งค่าความปลอดภัยของผู้ให้บริการ ถ้าจะแก้ไขแล้วอยากเก็บรหัสเดิมไว้ ให้เว้นช่องรหัสผ่านว่างไว้
- การเข้ารหัส
- SSL/TLS หรือ STARTTLS ขึ้นอยู่กับพอร์ตที่ผู้ให้บริการของคุณใช้ ส่วนใหญ่จะเลือก SSL/TLS บนพอร์ตที่ปลอดภัย
ทดสอบ
กด ทดสอบการเชื่อมต่อ ก่อนบันทึก DabDash จะลองเข้าสู่ระบบเพื่อยืนยันว่าข้อมูลใช้ได้ พอเชื่อมต่อสำเร็จ อีเมลใหม่จากลูกค้าจะเริ่มเด้งเข้ากล่องข้อความของคุณเองโดยอัตโนมัติ
เคล็ดลับ: ใช้ที่อยู่ซัพพอร์ตโดยเฉพาะ (เช่น support@yourstore.com) แทนกล่องจดหมายส่วนตัว เพื่อให้บทสนทนากับลูกค้าอยู่รวมเป็นระเบียบในที่เดียว
คำถามที่พบบ่อย
เชื่อมต่อโดเมนของตัวเองเข้ากับร้าน DabDash ยังไง?
ไปที่ ตั้งค่า → โดเมนและอีเมล ใส่โดเมนของคุณ (เช่น shop.yourbrand.com) แล้วเพิ่มเรกคอร์ด A (ชี้ไปที่ 93.95.229.147) และเรกคอร์ด DNS แบบ TXT ที่แสดงไว้ ลงในผู้รับจดทะเบียนโดเมนของคุณ กด ตรวจสอบ DNS — พอเผยแพร่เสร็จ (ปกติไม่ถึง 24 ชั่วโมง) ร้านคุณจะเปิดใช้งานบนโดเมนของคุณ
ตั้งผู้ส่งอีเมลของตัวเองใน DabDash ยังไง?
ใน ตั้งค่า → โดเมนและอีเมล ใส่ข้อมูลเซิร์ฟเวอร์ SMTP ของคุณ (host พอร์ต ชื่อผู้ใช้ รหัสผ่าน) ตั้งที่อยู่และชื่อผู้ส่ง แล้วใช้แผงทดสอบส่งอีเมลทดสอบ พอยืนยันแล้ว อีเมลถึงลูกค้าทั้งหมด (ยืนยันออเดอร์ แจ้งเตือน) จะมาจากที่อยู่ของคุณเอง
DabDash รองรับโดเมนของตัวเองโดยไม่มีค่าใช้จ่ายเพิ่มไหม?
รองรับ — ทุกร้าน DabDash ได้ซับโดเมนฟรี (yourstore.dabdash.com) และเชื่อมต่อโดเมนของตัวเองได้โดยไม่มีค่าใช้จ่ายเพิ่ม โดเมนของตัวเองช่วยเรื่องการจดจำแบรนด์และส่งผลดีต่ออันดับ SEO ในพื้นที่